Before we start I would like to bring your attention to this PSP course from Pentester Academy -
https://www.pentesteracademy.com/course?id=21. The course is focused on Powershell scripting which can be used in pentesting activities.

AGENDA :
1. Introduction to Powershell
2. Basic Authentication lab setup
3. Brute-force Basic Authentication using Powershell Script -
- cmdlet
- IP,Port and word-list should be easily configurable
1. Introduction to Powershell -
Microsoft says-
PowerShell is a task-based command-line shell and scripting language built on .NET. PowerShell helps system administrators and power-users rapidly automate tasks that manage operating systems (Linux, macOS, and Windows) and processes.
PowerShell commands let you manage computers from the command line. PowerShell providers let you access data stores, such as the registry and certificate store, as easily as you access the file system. PowerShell includes a rich expression parser and a fully developed scripting language.
2. Basic Authentication lab setup -
Basic Authentication is a simple authentication scheme built into the HTTP protocol. The client sends HTTP requests with the Authorization header that contains the word Basic word followed by a space and a base64-encoded string username:password. For example, to authorize as user demo and password as p@55w0rd the client would send header as -
Authorization: Basic ZGVtbzpwQDU1dzByZA==
401 Response -
You can also define the 401 “Unauthorized” response returned for requests with missing or incorrect credentials.
200 Response -
When the username password is correct i.e credentials are valid/correct.
In order to test our powershell script, we need to create a small lab setup so that we can validate the working of our powershell script.
I have used Ubuntu 14 for setting up nginx server and configured the basic authentication using following steps -
[X] Download a mini iso and install nginx on it -
Command to install nginx -
sudo apt-get update
sudo apt-get install nginx
Step 1 — Installing Apache Tools
You'll need the htpassword command to configure the password that will restrict access to the target website. This command is part of the apache2-utils package, so the first step is to install that package.
sudo apt-get install apache2-utils
Step 2 — Setting Up HTTP Basic Authentication Credentials
In this step, you'll create a password for the user running the website.
That password and the associated username will be stored in a file that you specify. The password will be encrypted and the name of the file can be anything you like. Here, we use the file /etc/nginx/.htpasswd and the username nginx.
To create the password, run the following command. You'll need to authenticate, then specify and confirm a password.
sudo htpasswd -c /etc/nginx/.htpasswd nginx
You can check the contents of the newly-created file to see the username and hashed password.
cat /etc/nginx/.htpasswd
Example /etc/nginx/.htpasswd
nginx:$apr1$ilgq7ZEO$OarDX15gjKAxuxzv0JTrO/
Step 3 — Updating the Nginx Configuration
Now that you've created the HTTP basic authentication credential, the next step is to update the Nginx configuration for the target website to use it.
HTTP basic authentication is made possible by the auth_basic and auth_basic_user_file directives. The value of auth_basic is any string, and will be displayed at the authentication prompt; the value of auth_basic_user_file is the path to the password file that was created in Step 2.
Both directives should be in the configuration file of the target website, which is normally located in /etc/nginx/sites-available directory. Open that file using nano or your favorite text editor.
sudo nano /etc/nginx/sites-available/default
Under the location section, add both directives:
/etc/nginx/sites-available/default.conf
. . .
server_name localhost;
location / {
# First attempt to serve request as file, then
# as directory, then fall back to displaying a 404.
try_files $uri $uri/ =404;
# Uncomment to enable naxsi on this location
# include /etc/nginx/naxsi.rules
auth_basic "Private Property";
auth_basic_user_file /etc/nginx/.htpasswd;
}
. . .
Save and close the file.
Step 4 — Testing the Setup
To apply the changes, first reload Nginx.
sudo service nginx reload
Now try accessing the website you just secured by going to http://your_server_ip/ in your favorite browser. You should be presented with an authentication window (which says "Private Property", the string we set for auth_basic), and you will not be able to access the website until you enter the correct credentials. If you enter the username and password you set, you'll see the default Nginx home page.
Brute-force Basic Authentication using Powershell Script -
The main task is to brute-force basic authentication. Since basic http authentication can be validated through a credential in Authorisation header while sending the web request.
Refer to the first portion of this post for understanding it with an example. Here we are going to write a powershell script which takes IP,PORT,WORDLIST etc as an input and adds a extra header of Authorisation with Basic value and base64 encoded username:password for authentication.
E.g-
Extra-Header -
Authorisation: Basic ZGVtbzpwQDU1dzByZA==
Powershell Script for Basic Auth Bruteforce -
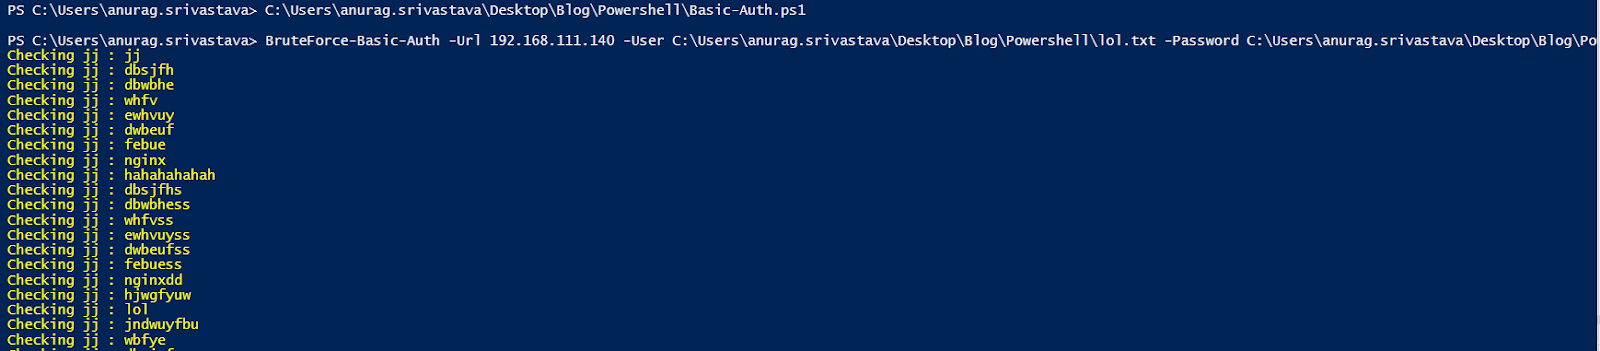
Proof of Concept -
Running script against the target -
 Credentials Found -

References -
https://swagger.io/docs/specification/authentication/basic-authentication/
The script can be found on my github -
https://github.com/hexachordanu/PSP/blob/master/Basic-Auth.ps1
This blog post has been created for completing the requirements of the SecurityTube PowerShell for Penetration Testers Certification Exam
https://www.pentesteracademy.com/course?id=21
Student ID: PSP-3250
https://www.pentesteracademy.com/course?id=21. The course is focused on Powershell scripting which can be used in pentesting activities.

AGENDA :
1. Introduction to Powershell
2. Basic Authentication lab setup
3. Brute-force Basic Authentication using Powershell Script -
- cmdlet
- IP,Port and word-list should be easily configurable
1. Introduction to Powershell -
Microsoft says-
PowerShell is a task-based command-line shell and scripting language built on .NET. PowerShell helps system administrators and power-users rapidly automate tasks that manage operating systems (Linux, macOS, and Windows) and processes.
PowerShell commands let you manage computers from the command line. PowerShell providers let you access data stores, such as the registry and certificate store, as easily as you access the file system. PowerShell includes a rich expression parser and a fully developed scripting language.
2. Basic Authentication lab setup -
Basic Authentication is a simple authentication scheme built into the HTTP protocol. The client sends HTTP requests with the Authorization header that contains the word Basic word followed by a space and a base64-encoded string username:password. For example, to authorize as user demo and password as p@55w0rd the client would send header as -
Authorization: Basic ZGVtbzpwQDU1dzByZA==
401 Response -
You can also define the 401 “Unauthorized” response returned for requests with missing or incorrect credentials.
200 Response -
When the username password is correct i.e credentials are valid/correct.
In order to test our powershell script, we need to create a small lab setup so that we can validate the working of our powershell script.
I have used Ubuntu 14 for setting up nginx server and configured the basic authentication using following steps -
[X] Download a mini iso and install nginx on it -
Command to install nginx -
sudo apt-get update
sudo apt-get install nginx
Step 1 — Installing Apache Tools
You'll need the htpassword command to configure the password that will restrict access to the target website. This command is part of the apache2-utils package, so the first step is to install that package.
sudo apt-get install apache2-utils
Step 2 — Setting Up HTTP Basic Authentication Credentials
In this step, you'll create a password for the user running the website.
That password and the associated username will be stored in a file that you specify. The password will be encrypted and the name of the file can be anything you like. Here, we use the file /etc/nginx/.htpasswd and the username nginx.
To create the password, run the following command. You'll need to authenticate, then specify and confirm a password.
sudo htpasswd -c /etc/nginx/.htpasswd nginx
You can check the contents of the newly-created file to see the username and hashed password.
cat /etc/nginx/.htpasswd
Example /etc/nginx/.htpasswd
nginx:$apr1$ilgq7ZEO$OarDX15gjKAxuxzv0JTrO/
Step 3 — Updating the Nginx Configuration
Now that you've created the HTTP basic authentication credential, the next step is to update the Nginx configuration for the target website to use it.
HTTP basic authentication is made possible by the auth_basic and auth_basic_user_file directives. The value of auth_basic is any string, and will be displayed at the authentication prompt; the value of auth_basic_user_file is the path to the password file that was created in Step 2.
Both directives should be in the configuration file of the target website, which is normally located in /etc/nginx/sites-available directory. Open that file using nano or your favorite text editor.
sudo nano /etc/nginx/sites-available/default
Under the location section, add both directives:
/etc/nginx/sites-available/default.conf
. . .
server_name localhost;
location / {
# First attempt to serve request as file, then
# as directory, then fall back to displaying a 404.
try_files $uri $uri/ =404;
# Uncomment to enable naxsi on this location
# include /etc/nginx/naxsi.rules
auth_basic "Private Property";
auth_basic_user_file /etc/nginx/.htpasswd;
}
. . .
Save and close the file.
Step 4 — Testing the Setup
To apply the changes, first reload Nginx.
sudo service nginx reload
Now try accessing the website you just secured by going to http://your_server_ip/ in your favorite browser. You should be presented with an authentication window (which says "Private Property", the string we set for auth_basic), and you will not be able to access the website until you enter the correct credentials. If you enter the username and password you set, you'll see the default Nginx home page.
Brute-force Basic Authentication using Powershell Script -
The main task is to brute-force basic authentication. Since basic http authentication can be validated through a credential in Authorisation header while sending the web request.
Refer to the first portion of this post for understanding it with an example. Here we are going to write a powershell script which takes IP,PORT,WORDLIST etc as an input and adds a extra header of Authorisation with Basic value and base64 encoded username:password for authentication.
E.g-
Extra-Header -
Authorisation: Basic ZGVtbzpwQDU1dzByZA==
Powershell Script for Basic Auth Bruteforce -
Proof of Concept -
Running script against the target -

References -
https://swagger.io/docs/specification/authentication/basic-authentication/
The script can be found on my github -
https://github.com/hexachordanu/PSP/blob/master/Basic-Auth.ps1
This blog post has been created for completing the requirements of the SecurityTube PowerShell for Penetration Testers Certification Exam
https://www.pentesteracademy.com/course?id=21
Student ID: PSP-3250
If you're going to be the vendor all evening, then do not 바카라사이트 have|you do not have} to buy chips. You can simply own all the chips within the get together and sell them to individuals as they need chips. You are effectively the bank and must finance all winnings and collect all losses incurred by the players. This choice opens you a lot as} greater gains or losses, and likewise makes it logistically harder to let other individuals be the vendor.
ReplyDelete